Eyelet punching is a crucial technique in various crafts and industries, from fashion design to manufacturing. This process involves creating holes in materials and securing them with eyelets to reinforce the holes, providing both functionality and decorative elements.
Importance of Eyelet Punching in Various Crafts and Industries
Eyelet punching enhances the durability and aesthetics of products. It’s widely used in making garments, shoes, bags, and even industrial equipment. Understanding how to punch eyelets correctly can significantly improve the quality and longevity of these items.
What Are Eyelets?
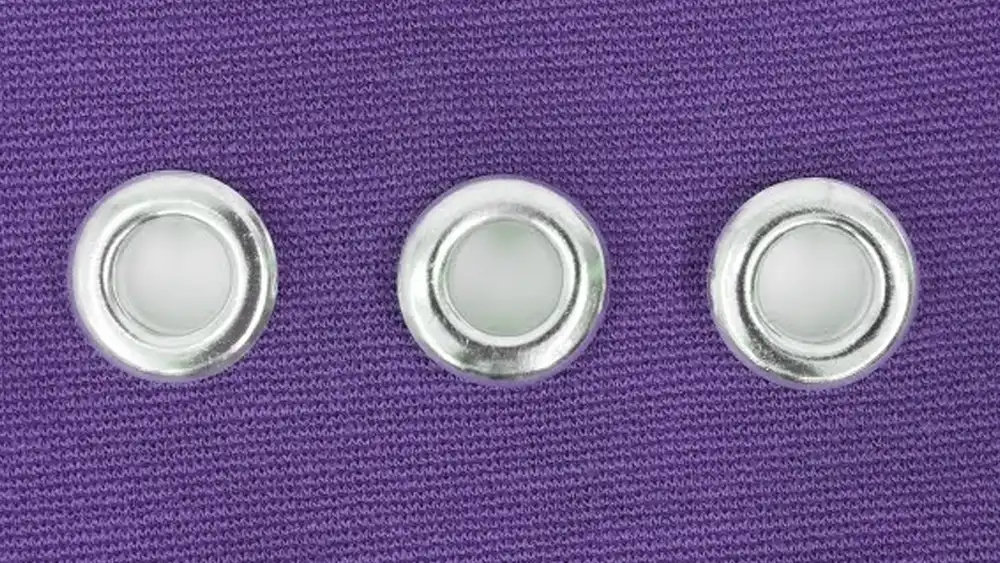
Eyelets are small rings made from metal, plastic, or other materials, inserted into holes in fabrics or other materials to prevent fraying and tearing. They also provide a finished look and facilitate lacing or fastening.
Types of Eyelets
- Standard Eyelets: Basic rings used in clothing and crafts.
- Grommets: Larger and more durable, often used in heavy-duty applications like tarps and sails.
- Decorative Eyelets: Designed with intricate patterns for aesthetic purposes.
Materials Used for Eyelets
Eyelets are typically made from materials such as brass, aluminum, stainless steel, and plastic. The choice of material depends on the application and desired durability.
What Is An Eyelet Punch
An eyelet punch is a specialized tool used to create holes and set eyelets in various materials, particularly fabric and leather. It consists of a handle and a hollow tube with a sharpened edge at one end. The tube is sized to match the diameter of the eyelet being used.
How an Eyelet Punch Works:
- Creating Holes: The sharpened edge of the punch is placed on the material where you want to place the eyelet. With a firm, even pressure, you press down on the handle of the punch, which cuts through the material, creating a clean hole.
- Setting Eyelets: After the hole is made, the eyelet is placed through the hole from the front side of the material. The eyelet punch tool typically includes a complementary setter tool. This setter tool is placed over the protruding part of the eyelet (the part that sticks out from the front side of the material). You then strike the setter tool with a hammer or mallet, which flattens the eyelet’s post against the washer or flange on the back side of the material, securing it in place.
Tools and Equipment Needed
Eyelet Punching Tools
- Handheld Punch Tools: Ideal for small projects and detailed work.
- Press Machines: Suitable for larger projects or repetitive tasks.
- Die Sets: Essential for creating consistent holes and securing eyelets.
Manual vs. Automatic Tools
- Manual Tools: Offer greater control and are cost-effective for hobbyists.
- Automatic Tools: Increase efficiency and are better suited for industrial applications.
Additional Supplies
- Cutting Mats: Protect your work surface and tools.
- Rulers and Marking Pens: For precise measurements and hole placement.
- Eyelet Kits: Usually include eyelets, punch tools, and setting tools.
Preparing for Eyelet Punching
Choosing the Right Eyelets
Select eyelets based on the material you are working with and the purpose of the project. Consider the size, material, and finish of the eyelets to ensure they match your needs.
Selecting the Appropriate Tools
Choose tools that are compatible with your eyelets and material. Ensure you have the correct die set and punch size.
Preparing the Material
- Measure and Mark: Use a ruler and marking pen to mark the exact spot where the eyelet will be placed.
- Cutting: Use a sharp tool to create a clean hole for the eyelet.
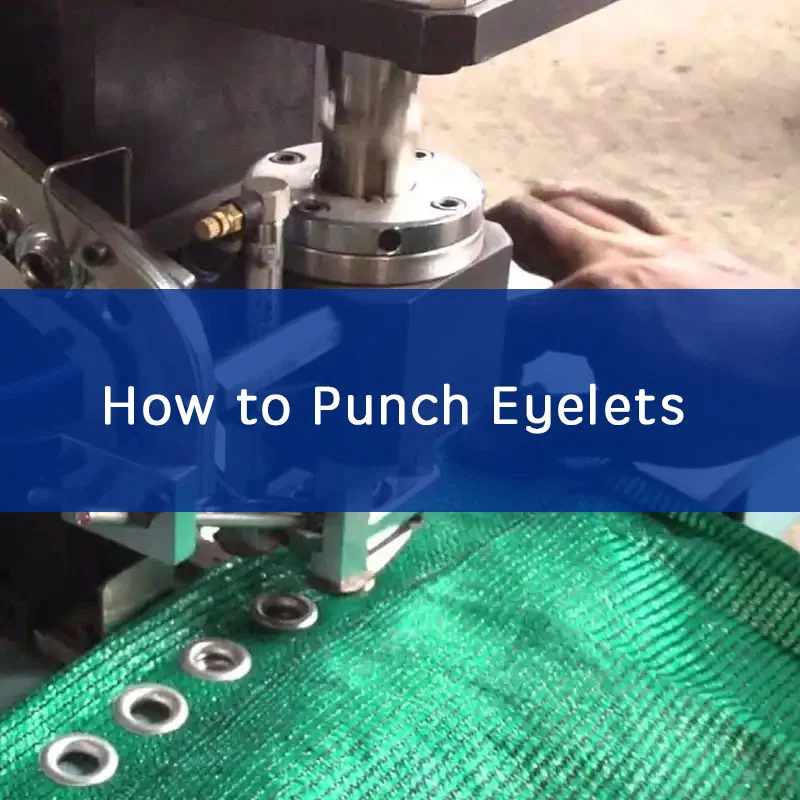
How to Punch Eyelets Step by Step
Marking the Material
- Lay the material flat on a cutting mat.
- Measure and mark the spot where the eyelet will go.
- Use a template if multiple eyelets need to be evenly spaced.
Creating the Hole
- Place the material on the cutting mat.
- Position the punch tool over the marked spot.
- Apply pressure to create a clean hole.
Inserting the Eyelet
- Insert the eyelet through the hole from the front.
- Ensure the flange is on the front side of the material.
Securing the Eyelet
- Place the material and eyelet on the anvil.
- Position the setting tool over the eyelet.
- Apply firm, even pressure to secure the eyelet.
Safety Precautions
Personal Protective Equipment (PPE)
- Safety Glasses: Protect your eyes from flying debris.
- Gloves: Shield your hands from sharp tools and materials.
Safe Handling of Tools
- Always use tools as directed.
- Keep hands clear of moving parts and cutting edges.
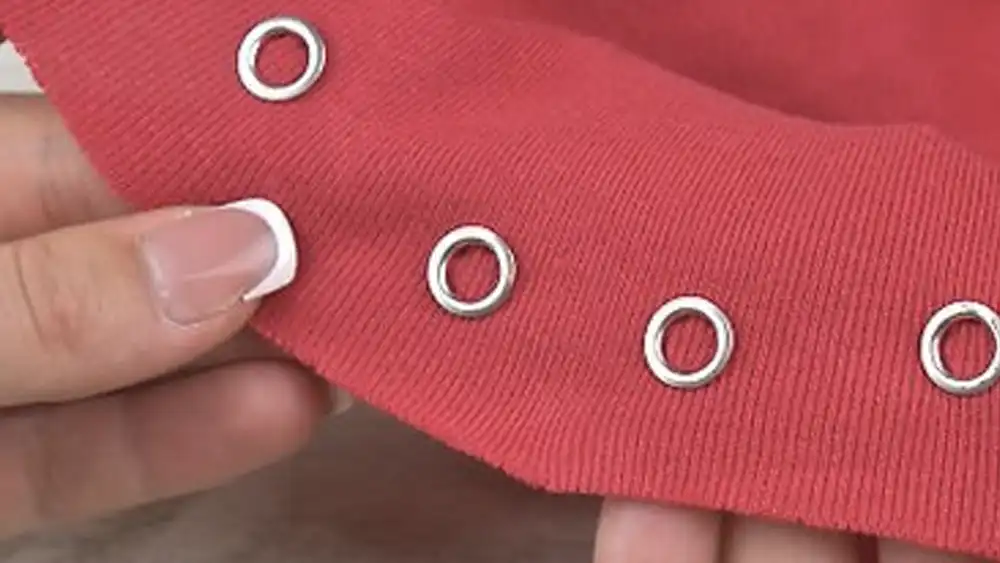
How to Punch Eyelets in Fabric
Punching eyelets in fabric can be done using a few different methods, depending on the tools you have available. Here’s a step-by-step guide:
Tools and Materials Needed:
- Eyelet kit (includes eyelets and tools)
- Fabric (prepped for eyelets)
- Hammer (rubber or mallet)
- Cutting tool (like scissors or a hole punch, depending on the eyelet size)
- Hard surface (like a cutting board or wooden block)
- Optional: An eyelet setter tool (if not included in your eyelet kit)
Steps:
Prepare Your Fabric:
- Mark the position where you want to place the eyelet on your fabric. Ensure the fabric is stabilized and won’t stretch or distort during the process.
Make a Hole:
- Use a hole punch or sharp scissors to make a hole slightly smaller than the diameter of the eyelet post. Place the cutting tool on the marked spot and carefully cut through the fabric. It’s important to make a clean, precise hole without fraying the fabric.
Insert the Eyelet:
- Insert the eyelet through the hole from the front side of the fabric, with the flange or washer on the back side.
Setting the Eyelet:
- Place the fabric with the inserted eyelet on a hard surface, such as a cutting board or wooden block.
- Position the eyelet setter tool over the eyelet’s post (the part that protrudes through the fabric).
- Strike the setter tool firmly with a hammer or mallet. This action will flatten the eyelet’s post against the washer or flange, securing it in place.
Check and Finish:
- After setting the eyelet, check to ensure it is securely in place and lays flat against the fabric.
- Trim any excess fabric around the eyelet hole if necessary, leaving a neat finish.
Tips:
- Practice on scrap fabric before applying eyelets to your main project to get a feel for the process and ensure you achieve the desired results.
- Ensure your tools are appropriate for the size of eyelets you are using. Larger eyelets may require a heavier hammer and more force to set properly.
- Always work on a stable, flat surface to avoid damaging your fabric or misaligning the eyelet.
By following these steps, you should be able to punch eyelets into fabric effectively and create professional-looking results for your projects.
Applications of Eyelets
In Fashion and Clothing
Eyelets are commonly used in clothing for decorative purposes and functional elements like lacing. They add a professional finish to garments.
In Home Décor
Eyelets are used in curtains, pillowcases, and other home décor items to add durability and style.
In Outdoor Equipment
Heavy-duty eyelets are essential in outdoor gear such as tents, tarps, and sails, providing strength and weather resistance.
Benefits of Using Eyelets
Durability and Strength
Eyelets reinforce holes, preventing tearing and extending the lifespan of the material.
Aesthetic Appeal
Available in various designs and finishes, eyelets enhance the visual appeal of projects.
Versatility
Eyelets can be used in numerous applications, from fashion to industrial uses.
Advanced Techniques in Eyelet Punching
Decorative Eyelet Patterns
Experiment with different arrangements and colors to create unique designs.
Combining Eyelets with Other Fasteners
Mix eyelets with buttons, zippers, and other fasteners for added functionality and design complexity.
DIY Projects with Eyelets
Craft Ideas for Beginners
- Simple Tote Bags: Add eyelets for handles.
- Decorative Wall Hangings: Use eyelets to attach ribbons or cords.
Advanced Craft Projects
- Custom Shoes: Design your own laced footwear with eyelets.
- Fashion Accessories: Create belts, bracelets, and more with eyelets.
Eyelet Punching for Commercial Use
Industrial Applications
Used in manufacturing to create durable products such as tarps, banners, and machinery covers.
Quality Control in Mass Production
Ensure consistent quality and durability by using high-quality materials and maintaining tools.
Maintaining Your Tools
Cleaning and Storage Tips
- Clean tools after each use.
- Store in a dry place to prevent rust and damage.
Sharpening and Replacing Parts
- Regularly check and sharpen blades and punches.
- Replace worn or damaged parts promptly.
Conclusion
Eyelet punching is a valuable skill in various crafts and industries. With the right tools and techniques, you can create durable, aesthetically pleasing products.
Whether you’re a hobbyist or a professional, mastering eyelet punching can enhance your projects and open up new creative possibilities.