Eyelet Pliers are becoming more and more popular, so How to Use Eyelet Pliers.
What Are Eyelet Pliers
Eyelet pliers are specialized hand tools used to insert eyelets into fabric, leather, and other materials. Eyelets, small metal rings, are commonly used to reinforce holes for laces, cords, or hooks in various DIY projects, including fashion design, craftwork, and home decor.
Common Uses of Eyelet Pliers
Eyelet pliers are incredibly versatile, often used in projects like making custom clothing, adding grommets to banners, creating jewelry, or even reinforcing fabric for curtains and upholstery. They help you achieve clean, secure, and professional-looking results.
What is Eyelet
An eyelet is a small, usually round or oval-shaped metal or plastic ring used to reinforce holes in fabric, paper, or other materials. It is commonly used in sewing and garment making to create a durable opening for laces, cords, or drawstrings to pass through. The eyelet typically consists of two parts: a grommet-like ring and a washer that secures it in place. Eyelets are commonly found in items like shoes, curtains, and bags, as well as in various textile products like clothing and upholstery.
In fabric, eyelets are often used in fashion design, where they provide both functional and decorative purposes. They can be attached by hand or with a machine, and the process usually involves using an eyelet punch or machine to insert and secure the eyelet into place.
Why You Should Invest in Eyelet Pliers
Investing in eyelet pliers ensures precision and ease when installing eyelets. These tools make the process quick and efficient, preventing mistakes that can arise from using improper tools like hammers or manual grommet setters.
Parts and Features of Eyelet Pliers
Understanding the Components
Eyelet pliers are designed with a few key components that make them efficient for installing eyelets. These include the handles, jaws, and an integrated setting mechanism. By understanding each part’s function, you can ensure the pliers are used properly.
Handles and Grips
The handles of eyelet pliers are ergonomically designed for comfort. Typically made from sturdy materials like plastic or metal, the handles may feature rubber grips for better control, reducing hand fatigue during prolonged use.
Pliers Jaws and Mechanism
The jaws are the most important part of the tool. These should align perfectly to ensure the eyelet is set evenly. The mechanism works by applying consistent pressure to secure the eyelet in place without damaging the surrounding fabric.
Different Types of Jaws (Flat, Round, etc.)
The type of jaw you need depends on your project. Flat jaws are ideal for most applications, while round jaws are better for projects requiring more rounded or precise eyelet shapes.
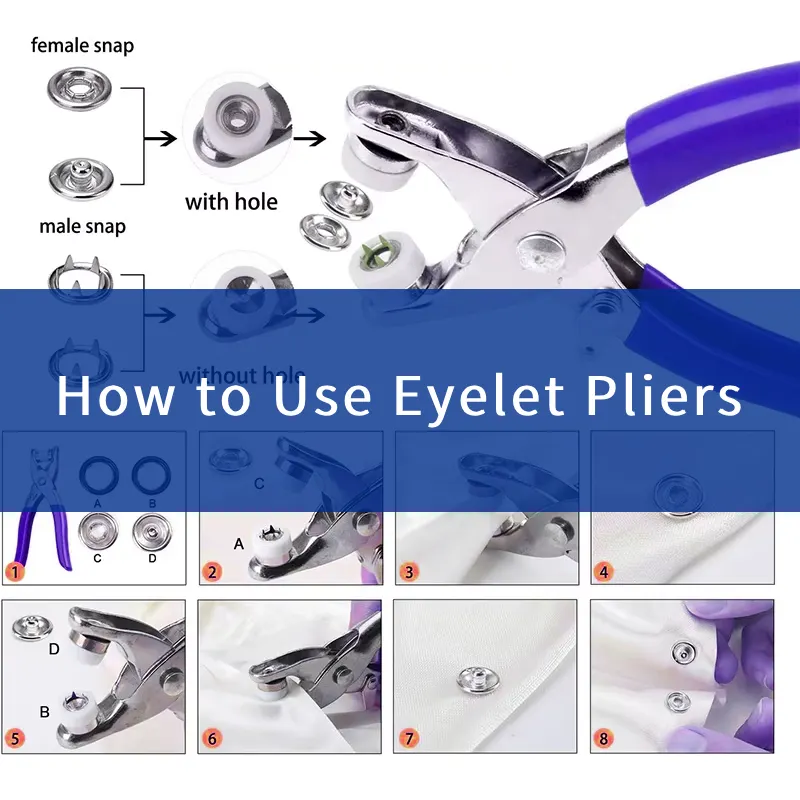
How to Use Eyelet Pliers
The Mechanism Behind Eyelet Pliers
Eyelet pliers work by pressing the two halves of an eyelet together, clamping the material between them to secure the eyelet firmly. This is done through a squeezing motion, which activates the mechanism that forces the eyelet into the fabric.
How to Insert Eyelets Using Pliers
To use the pliers, simply position the eyelet over the hole in the fabric and press down on the handles. The tool will secure the eyelet, creating a snug fit. It’s important to apply consistent pressure to avoid misalignment or uneven placement.
Adjusting Eyelet Pliers for Different Sizes
Most eyelet pliers come with adjustable settings for different-sized eyelets. Be sure to check the size compatibility of your pliers to the eyelets you plan to use to avoid over-sizing or under-sizing the hole.
Choosing the Right Eyelet Pliers
Factors to Consider When Choosing Pliers
When shopping for eyelet pliers, consider the size of eyelets you plan to use, the material thickness (fabric, leather, etc.), and how frequently you will use the tool. A high-quality set of pliers can save you time and ensure a durable result.
Pliers for Different Fabric Types
Different fabrics require different pressure levels. If you’re working with delicate fabrics like silk or tulle, look for pliers that offer a softer squeeze to prevent tearing. For heavy-duty materials like canvas or leather, opt for stronger, heavy-duty pliers.
Size and Strength of Eyelet Pliers
Size matters when it comes to pliers. For large eyelets, you may need a bigger pair of pliers with more force to press the eyelet securely. Smaller eyelets, on the other hand, can be installed using compact pliers with finer jaws for precision.
How to Use Eyelet Pliers Step by Step
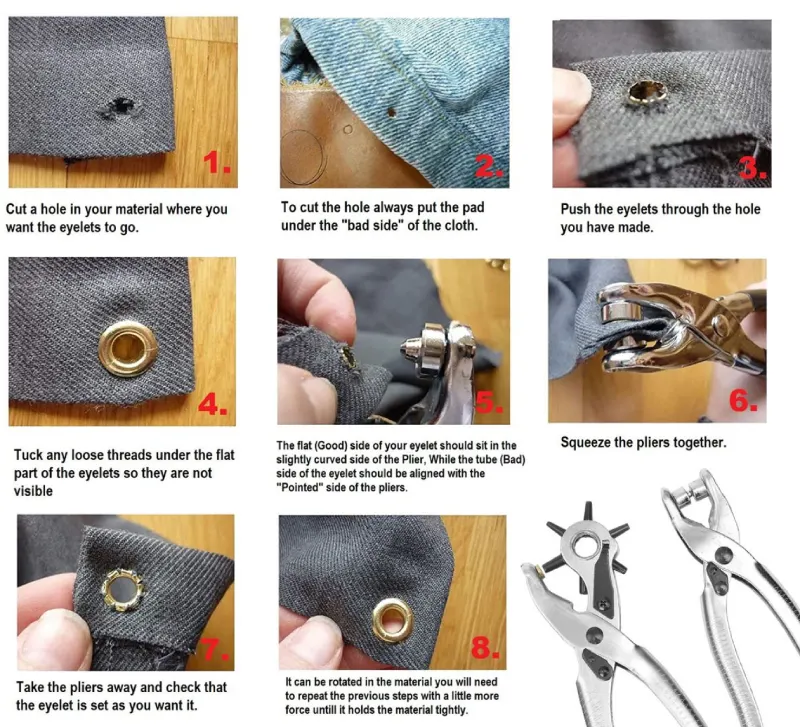
Step 1: Preparing Your Fabric and Materials
Before you start using the eyelet pliers, ensure your fabric is properly prepped. Cut it to the desired size and mark where the eyelet will be placed. Use a fabric marker or chalk to indicate the exact spot.
Marking the Spot for Eyelet Placement
Use a ruler to measure and mark the location of each eyelet. Precision is key, as misalignment can affect the overall look of your project. A small hole punch may be necessary to create the initial hole for the eyelet.
Step 2: Inserting the Eyelets
Place the eyelet in the hole you’ve created, ensuring it’s aligned properly. Open your pliers, position them over the eyelet, and gently squeeze the handles together. Apply firm, consistent pressure to secure the eyelet in place.
Positioning and Aligning the Eyelets
Ensure the eyelet is centered over the hole before squeezing. If you’re working with multiple eyelets, check the alignment frequently to maintain uniformity across your project.
Applying Even Pressure
It’s crucial to apply even pressure to both sides of the eyelet to ensure it is securely set. Inconsistent pressure can cause the eyelet to sit crooked or not fully close.
Step 3: Checking for Secure Eyelet Placement
Once the eyelet is inserted, check both sides to ensure it’s properly secured. The back should have a flat, smooth finish with no visible gaps. If you notice any loose or uneven areas, reapply pressure with the pliers.
Inspecting the Back Side of Eyelets
Inspect the back of the eyelet to ensure it is fully compressed. If necessary, reapply the pliers, but be careful not to over-tighten.
Common Mistakes When Using Eyelet Pliers
Over-tightening the Eyelet
One common mistake is over-tightening the eyelet, which can cause the fabric to wrinkle or tear. It’s essential to apply just enough pressure to secure the eyelet without damaging the material.
Misalignment Issues
Another mistake is improper alignment of the eyelet, which can lead to an uneven look. Always ensure that your markings are precise, and double-check alignment before squeezing the pliers.
Choosing the Wrong Size Eyelet
Using the wrong size eyelet can ruin your project. Always check the size of the eyelet against the hole and fabric thickness to ensure compatibility.
Tips for Efficient Use of Eyelet Pliers
How to Avoid Fabric Damage
When working with delicate fabrics, consider using a stabilizer to reinforce the area around the eyelet. This helps prevent the fabric from stretching or tearing under pressure.
Cleaning and Maintaining Your Pliers
To keep your eyelet pliers in good working condition, regularly clean the jaws and lubricate any moving parts. This will ensure smooth operation and extend the lifespan of the tool.
FAQs
Can I use eyelet pliers for leather?
Yes, eyelet pliers can be used for leather. Make sure to use heavy-duty pliers to accommodate the toughness of the material.
How do I choose the right size eyelet for my project?
The right size depends on your fabric and the purpose of the eyelet. Larger eyelets work best for heavy fabrics like canvas, while smaller eyelets are ideal for lighter materials.
What materials can I use with eyelet pliers?
You can use eyelet pliers on fabric, leather, plastic, and other thin, flexible materials.
How do I avoid damaging delicate fabrics?
Use a stabilizer or interfacing behind the fabric to protect it from damage and to give the eyelet a solid base for insertion.
Conclusion
Recap of Best Practices for Using Eyelet Pliers
Using eyelet pliers is simple, but precision and proper technique are essential for achieving professional results. Always ensure that your fabric is prepared, the eyelet is correctly sized, and even pressure is applied during insertion.
Final Thoughts on Eyelet Pliers
With the right eyelet pliers and a little practice, you’ll be able to tackle a wide variety of projects with ease. From custom clothing to craft projects, eyelet pliers are an indispensable tool for any DIY enthusiast or professional.