

An eyelet die change can look short if you time only the moment when the old tooling comes out and the new tooling goes in. Production sees a longer stop.
The real changeover begins when the last good piece of the current job leaves the machine at normal running conditions. It ends when the next job produces its first approved piece and can continue at the required rate.
Searching for a wrench, cleaning a die seat, finding the correct setup record, emptying old eyelets, correcting feeder handoff, making trial pieces, and waiting for quality approval all belong to that clock.
SMED helps you attack the full loss. The name means Single-Minute Exchange of Die, but you do not improve by making an operator rush. You improve by moving preparation outside the stopped period, removing unnecessary adjustment, and giving every person a clear sequence.
This guide starts after you have approved the eyelet, washer, material, and die combination. If you still need to choose or match the tooling, use our die-selection guide and eyelet, washer, and die matching guide first. Here, you are improving the operating method for a known setup, not selecting a die.
Quick Answer: How Do You Reduce Eyelet Die Changeover Time?
Use this SMED sequence:
- Time the current changeover from the last good part to the first good part.
- Break the work into small, observable steps.
- Mark each step as internal or external.
- Complete every possible external step before the machine stops.
- Convert internal adjustments into preset positions, recipes, gauges, or approved modules.
- Simplify the remaining stopped work with point-of-use tools, clear labels, and functional fasteners.
- Run safe parallel tasks only when people do not enter the same hazard area.
- Use a fixed first-piece approval rule so the clock does not disappear into trial-and-error.
- Record the new method and time the next several changeovers.
Your first target does not have to be less than ten minutes. Reduce the stopped time safely, make the result repeatable across operators, and then improve the next constraint.
Define the Changeover Before You Try to Shorten It
If each shift uses a different start and finish point, your numbers will not show whether the method improved.
Use one definition:
MEASUREMENT RULE Changeover time = last good part from job A at normal conditions to first approved part from job B at the required operating condition.
This definition prevents three common measurement errors. You cannot stop the clock when the eyelet machine dies are merely installed. You cannot exclude the trial pieces needed to correct the new setup. You also cannot call a hand-fed sample complete when the automatic line still cannot feed and run consistently.
Record at least five normal changeovers for one repeated product transition. Use the same transition if possible, such as eyelet family A to eyelet family B on the same machine. Note the operator, product codes, machine, start time, first-good-part time, setup scrap, and every interruption.
Video is useful when your plant rules permit it. Position the camera so you can see movement and waiting without recording restricted information. Review the changeover with the people who perform it. The purpose is to expose the work, not to rate the operator.
Break the footage into elements small enough to act on:
- walk to the tooling cabinet;
- find the setup card;
- collect the upper and lower dies;
- stop and isolate the machine;
- remove remaining components from the feed path;
- remove the old tooling;
- clean and inspect the mounting surfaces;
- install the approved tooling;
- restore the approved machine recipe or mechanical settings;
- verify the handoff and guarding;
- make setup pieces;
- inspect and approve the first good part;
- return the previous tooling and record its condition.
Do not write “change dies – 12 minutes” as one element. That description hides the delay you need to remove.
Separate Internal Work From External Work

An internal task requires the machine to be stopped. An external task can be completed before the stop or after production has restarted.
On an eyelet machine, physically removing and installing tooling is usually internal. Retrieving eyelet machine dies from storage is external. Cleaning a mounting face may be internal, but confirming that the incoming die set is clean, complete, identified, and fit for service is external.
Entering the new product recipe may require a controlled machine state, but finding the recipe and checking its revision should happen beforehand.
Build a simple element sheet with five columns: step, current time, internal or external, problem observed, and proposed method. Then challenge every internal step with two questions:
- Why must the machine be stopped for this?
- What would let you prepare or verify it before the stop?
You will often find that the tooling swap is not the main loss. Walking, searching, cleaning neglected tools, looking for samples, waiting for material, and asking someone to confirm a setting can consume more time than the mechanical exchange.
Stage the Next Job Before the Last Good Part
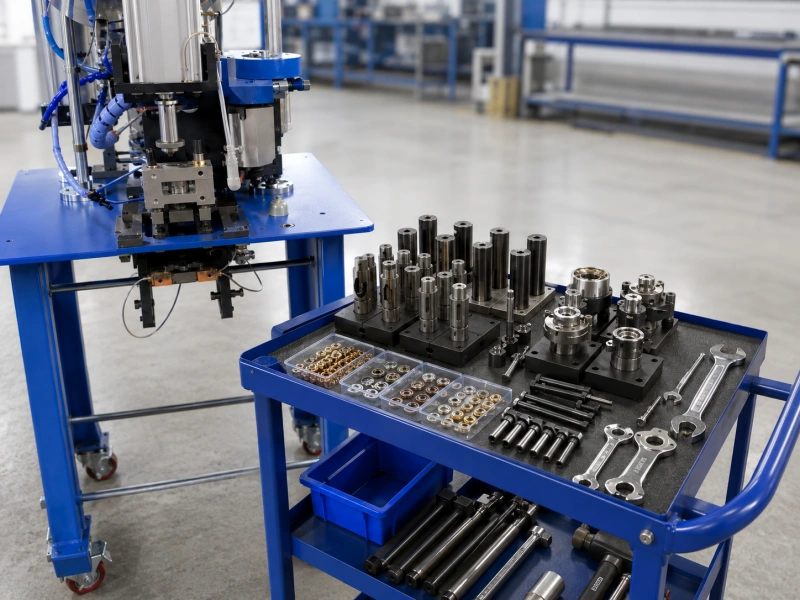
Create a changeover cart or fixed staging position for the next job. It should arrive before the current batch ends and contain only what the approved setup requires.
Your staged kit may include:
- the identified upper and lower die set in serviceable condition;
- approved size-specific holders, adapters, guides, tracks, tubes, escapement parts, or washer components;
- the correct eyelets, washers, and production material;
- the current setup card or digital recipe reference;
- the permitted hand tools, gauges, cleaning items, and fasteners;
- labeled containers for removed tooling and remaining components;
- the approved sample or clear first-piece acceptance image;
- inspection equipment required for release.
Use a kit checklist. A cart that is missing one spacer or gauge simply moves the search closer to the machine.
Confirm the incoming die set before the machine stops. Check its identification, condition, completeness, and storage protection. If it is damaged, dirty, incomplete, or awaiting maintenance, replace it in the kit before the current run ends. Do not use changeover time to decide whether a tool should be sharpened or replaced; that decision belongs in your tooling-control process.
Return the old die set after the new job is running, unless leaving it at the machine creates a safety, damage, or mix-up risk. Tag its status immediately: ready, clean required, inspection required, repair required, or scrap. This makes the outgoing-tool work external without losing traceability.
Replace Adjustment With Repeatable Positioning
The fastest adjustment is the one you no longer need to make.
Look at every place where the operator loosens, moves, tests, and moves again. You may be able to replace that loop with a fixed reference:
- positive stops or shoulders that locate the holder;
- keyed or asymmetric interfaces that prevent reversed installation;
- dowels or locating features that establish position before clamping;
- engraved centerlines or durable reference marks;
- captive spacers or approved shim packs identified by product code;
- digital position values or mechanical scale readings on the setup card;
- machine recipes with controlled names and revision levels;
- go/no-go gauges for a repeatable interface;
- preassembled tooling modules that exchange as one unit.
These changes must suit the machine design and the forces involved. Do not add homemade quick releases, modify guarding, remove required fasteners, or alter a load-bearing tool interface without the machine or tooling manufacturer’s approval.
Functional clamps can reduce the number of turns or separate fasteners needed, but speed is not the only requirement. The clamping method must locate the tooling, resist operating load, remain inspectable, and fail safely.
On a small eyelet press, the best improvement may be a manufacturer-approved quick-change holder. On a more complex automatic system, the larger gain may come from exchanging a pre-adjusted track-and-tooling module.
The HANG 101-70/101-80 product information, for example, presents easy changeover across a stated range of eyelet sizes. It does not publish the detailed method or a guaranteed time. That is a useful benchmark: changeover performance depends partly on how the machine and its change parts were designed, but you still need a controlled operating method to obtain repeatable results in your factory.
Treat Automatic-Machine Changeover as a System
On a manual or pneumatic eyelet press, the stopped work may be concentrated around the upper die, lower die, holder, stop, and operating setting. On an automatic eyelet machine, the die is only one part of the conversion.
The eyelet or washer feed system may also require product removal, change parts, recipe selection, track alignment, escapement checks, sensor confirmation, and refill. If you improve only the die exchange, the bottleneck moves to the bowl or transfer path.
Map each feeding component as a separate element and decide whether it can be prepared as a module. A second pre-adjusted guide or track may allow offline preparation. A dedicated, labeled change-part kit may prevent mixed rails and tubes. Plug-and-locate interfaces can reduce reconnection and alignment time when they are designed and approved for the machine.
Do not repeat the full feeder clearance procedure during every SMED review. Your approved feeder recipe should already define the required change parts and baseline positions. For the detailed size-change method, use our vibratory bowl feeder setup guide. During the changeover, your job is to restore that approved condition and confirm the handoff, not rediscover it.
Where old eyelets can remain trapped in a bowl, return pocket, chute, tube, or escapement, include a line-clearance check. One component from the previous job can create a mixed-product defect after the machine restarts.
Protect the Safety Boundary
SMED removes waste. It does not remove energy-control, guarding, or verification steps.
Follow the machine manual, your risk assessment, and the lockout/tagout or energy-isolation rules that apply at your site. Eyelet machines may contain electrical, pneumatic, hydraulic, spring, gravity, or stored mechanical energy. A stopped control, emergency stop, light curtain, two-hand control, or setup mode is not automatically an energy-isolating device.
Define which tasks require full isolation and which limited testing or positioning tasks may be performed under an approved setup procedure. Do not let operators decide this from memory during a timed changeover. The written method should specify the safe state, who controls it, how stored energy is handled, and what must happen before controlled testing resumes.
When two people work in parallel, give each person a separate zone and a clear handoff. Parallel work is useful only when one person cannot energize, move, or release something that exposes the other person. If the tasks overlap at the die space, feeder, controls, or guarding, perform them sequentially.
Never publish a “record changeover” that skipped a safety step. That teaches the wrong standard.
Control the First-Good-Part Phase
Many changeovers lose their gains after the tools are installed. The operator makes one part, changes pressure, changes die position, adjusts the feeder, makes another part, and waits for a supervisor. The stopwatch is still running.
Use a setup card that restores a previously approved condition. It should identify the machine and product, the approved die set, the relevant mechanical positions or recipe, the required change parts, and the first-piece checks. It should point to your controlled setting-force record rather than replacing it with guesswork.
If you have not established a safe operating range, use our setting-force window guide before you standardize the changeover.

Set the first-piece approval plan before the stop:
- have the correct production material at the machine;
- have the inspector or authorized operator available;
- state how many setup pieces are expected;
- define the front, back, dimensional, spin, pull, or functional checks that apply;
- keep the approved sample or images beside the setup record;
- record the reason for every adjustment after the baseline is restored.
Separate setup scrap from acceptance samples. One attractive part is not evidence that the machine is ready for a sustained automatic run. The exact release quantity depends on your product and quality plan, but the rule should be fixed before the changeover begins.
If the first piece fails, do not change several variables at once. Compare the actual setup with the card, find the first deviation, correct one cause, and record it. Recurring correction after every changeover means the preset, hardware, tooling condition, machine condition, or setup record is not yet capable.
Use a Three-Phase Standard Changeover
Phase 1: Before the machine stops
- Confirm the next production order, material, fasteners, and approved setup revision.
- Stage and check the complete tooling and change-part kit.
- Verify that the eyelet machine dies are clean, identified, complete, and released for use.
- Prepare the permitted tools, gauges, containers, setup pieces, and inspection method.
- Load or queue the approved recipe where the control system permits offline preparation.
- Confirm that the operator, helper, and quality approver know their roles.
- Mark the last good piece from the current run and start the changeover clock.
Phase 2: During the stopped window
- Stop the machine and place it in the defined safe state.
- Remove remaining product components where required for line clearance.
- Remove the outgoing tooling and place it in the labeled return container.
- Clean and inspect only the machine interfaces that could not be handled externally.
- Install the approved tooling and change parts using the defined locating and clamping sequence.
- Restore the documented positions, settings, and recipe.
- Verify fasteners, connectors, sensors, guards, feed handoff, and tool clearance according to the machine procedure.
- Remove tools and loose items, clear personnel, and complete the controlled return-to-service steps.
Phase 3: Restart and release
- Run the permitted setup or single-cycle checks.
- Make the defined setup pieces on representative material.
- Inspect against the approved criteria.
- Correct only identified deviations and record the adjustment.
- Produce and approve the first good part or defined acceptance group.
- Confirm stable feeding and the required operating condition.
- Stop the changeover clock.
- Restart production, return the old tooling, and close the changeover record.
Print this sequence as a one-point work instruction only after you have tested it on the actual machine. A generic checklist should not override the manufacturer’s procedure.
Improve in the Right Order
Start with low-cost operating changes. They reveal whether you really need new hardware.
First, remove searching and waiting. Label tooling, assign storage positions, prepare kits, control setup records, and ensure inspection is available. Next, reduce motion by moving permitted tools and change parts to point of use. Then standardize the sequence, responsibilities, settings, and status labels.
After those changes are stable, evaluate engineering improvements:
- duplicate gauges or offline preset fixtures;
- dedicated holders or preassembled change modules;
- manufacturer-approved quick-change die holders;
- captive or functional fasteners;
- positive locating features;
- quick, keyed connections for approved modular components;
- recipe management and position indication;
- carts or handling aids sized for the actual tooling.
Heavy stamping-press SMED sources often discuss die lifters, rolling bolsters, hydraulic clamps, and transfer carts. The principle is relevant, but the equipment usually is not. Eyelet machine dies are much smaller, and an oversized quick-die-change system may add cost and complexity without removing your real constraint. Use hardware only after the element log shows where time is being lost.
Measure More Than the Best Time
A single fast changeover can hide an unstable process. Track a small set of measures for the same product transition:
- total last-good-to-first-good time;
- internal stopped time;
- external preparation time;
- first-piece approval time;
- number of setup pieces and rejected pieces;
- number and duration of adjustments;
- walking, searching, and waiting time;
- missing or incorrect kit items;
- safety or procedure deviations;
- changeover time by operator or shift.
Use the median of several changeovers as your main result and also watch the range. If one operator completes the work in 12 minutes and another needs 28, you do not yet have standard work.
An illustrative improvement may look like this: a 32-minute baseline contains 9 minutes of retrieval and checking, 8 minutes of physical exchange, 7 minutes of feeder and setting adjustment, and 8 minutes of trial and approval. External staging removes 7 minutes from the stopped window.
Positive locations and recorded settings remove 4 minutes of adjustment. Prepared inspection removes 3 minutes of waiting. The new changeover is 18 minutes.
Those figures are an example, not a promise. Your element times determine your result. After the 18-minute method is stable, review the remaining 8-minute exchange and 5-minute release phase for the next improvement.
Common SMED Mistakes on Eyelet Machines
Timing only the mechanical die swap
You miss feeder work, trial pieces, quality approval, and ramp-up. Measure from the last good part to the first good part.
Staging unverified tooling
A die on a cart is not ready merely because it arrived. Confirm identity, condition, completeness, and release status before the stop.
Turning a selection problem into a changeover problem
SMED assumes an approved combination. If the die, eyelet, washer, or material is not matched, send the job back to process validation instead of tuning indefinitely at the machine.
Copying settings without controlling the setup
A pressure value alone does not reproduce die position, stroke, dwell, feeder condition, material stack, or tooling wear. Use a complete setup identity.
Buying quick-change hardware first
Fast clamps cannot remove time spent searching for components or waiting for inspection. Observe before you invest.
Running two-person work without zones
Uncoordinated parallel work adds risk and can create interference. Define tasks, safe states, zones, and handoffs.
Chasing a record instead of a standard
Your goal is not the quickest operator on the easiest job. Your goal is a safe method that trained operators can repeat with controlled quality.
Eyelet Die Changeover Checklist
Before the stop, confirm that:
- the next job and setup revision are correct;
- all eyelets, washers, materials, dies, and change parts are staged;
- incoming tooling is clean, identified, complete, and serviceable;
- tools, gauges, samples, and inspection resources are ready;
- roles and the required safe state are understood.
Before restart, confirm that:
- the previous product has been cleared where required;
- tooling and change parts are seated, located, and secured;
- settings and recipe match the approved record;
- connectors, sensors, feed handoffs, guards, and loose-item checks are complete;
- every person is clear and the return-to-service procedure is complete.
Before production release, confirm that:
- setup pieces were made on representative material;
- the defined front, back, dimensional, and functional checks passed;
- feeding is stable at the required condition;
- the first good part or acceptance group is identified;
- the time, scrap, adjustments, and tooling status were recorded.
FAQ
What does SMED mean for an eyelet machine?
SMED is a method for reducing the complete product changeover. You separate work that requires the machine to be stopped from work you can do before or after the stop, convert internal work to external work where possible, and simplify the remaining tasks.
Does a SMED changeover have to take less than ten minutes?
Single-digit minutes are the traditional target, not permission to skip required work. A safe, repeatable reduction from 40 minutes to 20 minutes is a valid first cycle. Continue improving from measured constraints.
When should you start and stop the changeover timer?
Start after the last good part of the previous job at normal conditions. Stop when the next job has produced its first approved part and is ready to continue at the required operating condition.
Can you prepare eyelet machine dies while the machine is running?
You can usually retrieve, identify, inspect, and stage the incoming die set externally. Physical removal or installation at the machine generally requires a stopped, controlled state. Follow the machine manual and your site’s energy-control procedure.
What should be on an eyelet-machine setup card?
Identify the machine, product, approved die set, required change parts, controlled positions or recipe, material and fastener codes, first-piece checks, approved sample reference, and revision. Link detailed selection, feeder, and force-validation records instead of duplicating them.
When should you buy a quick-change die holder?
Consider it after your element study shows that releasing, removing, locating, and securing the die remains a major share of internal time. Confirm compatibility, load capacity, positioning repeatability, guarding, and approval with the machine or tooling manufacturer.
Build the Method Into the Machine and the Work
You reduce eyelet die changeover time by designing readiness into the process. The next tooling set arrives checked. Every item has a location. The machine returns to a documented condition. The operator follows one safe sequence. Quality knows exactly what releases the job.
Start with one frequent changeover. Record it, separate internal and external work, and remove one delay at a time. Once the new method works across several operators and shifts, lock it into the setup card, tooling kit, training, and machine design.
If you are specifying a new eyelet machine, send us your full product family and expected changeover frequency. We can review the tooling interface, feed-system change parts, setup records, and trial requirements before the machine is built, so changeover is treated as a production requirement rather than an afterthought.